Autor Tema: ARM Cortex: Inicializacion  (Leído 2580 veces)

0 Usuarios y 1 Visitante están viendo este tema.

Desconectado george.manson.69

  • PIC10
  • *
  • Mensajes: 33
    • Microcontroladores en General
ARM Cortex: Inicializacion
« en: 24 de Marzo de 2014, 18:09:18 »
Hola a todos,

Les compartiore algunos tutoriales para empezar a programar en Keil para los ARM cortex, en mi caso estoy usando el LPC1114/302 que
tiene un procesador ARM CORTEX M0.


MANUAL 1.1http://www.mediafire.com/download/152ch123h0g1v01/UCURSOS+1.1.pdf
Ejemplos
Manual 1.0

Arm Cortex: UART

Código: [Seleccionar]
#include <LPC11xx.h>
#include "SetClock48Mhz.h"
#include "TickTimer.h"
#include "SetUart.h"

#define ANALOG_INPUTS 0x03
#define MAX_BAUDRATE 115200
#define MAX_ADC_CLOCK 2400000


uint16_t _index;
uint16_t ADC_BUFFER[2];


uint32_t Read_ADC(uint8_t ch){

LPC_ADC->CR |= (0x01 << ch)|(1<<24);

while(!(LPC_ADC->STAT&(1<<ch)));
LPC_ADC->CR &=~(0x01 << ch);

return ((LPC_ADC->DR[ch] >> 6) & 0x3FF);
}


void SetADC(uint8_t Set_ADC_In,uint32_t AdcClk){


LPC_SYSCON->PDRUNCFG &= ~(0x1<<4); //Habilita el Reloj hacia el ADC

LPC_SYSCON->SYSAHBCLKCTRL |= (1<<13); //Habilita Reloj para configurar ADC
LPC_SYSCON->SYSAHBCLKCTRL |= (1<<16); //Habilita Reloj para configurar Pines E/S

if((Set_ADC_In&(1<<0x00))){

LPC_IOCON->R_PIO0_11 = 0x02;

}
if((Set_ADC_In&(1<<0x01))){

LPC_IOCON->R_PIO1_0 = 0x02;

}
if((Set_ADC_In&(1<<0x02))){

LPC_IOCON->R_PIO1_1 = 0x02;

}
if((Set_ADC_In&(1<<0x03))){

LPC_IOCON->R_PIO1_2 = 0x02;

}

LPC_ADC->CR |= (1<<1)| (((48000000/AdcClk)-1)<<8) | (0<<16)| (0<<17) | (0<<24);

LPC_SYSCON->SYSAHBCLKCTRL &= ~(1<<16); //Deshabilita Reloj para configurar Pines E/S

}

/*
Funcion de Inicializar Salidas y entradas
*/
void SetIOs(void){
LPC_GPIO0->DIR =(1<<8) + (1<<9);
}

int main(void){

SetClockTo48Mhz();
SetUartTo(MAX_BAUDRATE);
SetADC(ANALOG_INPUTS,MAX_ADC_CLOCK);
SetIOs();

LPC_GPIO0->DATA &=~(1<<9);
delay_ms(1000);
LPC_GPIO0->DATA |=(1<<9);

while(1){

for(_index=0;_index<sizeof(ADC_BUFFER);_index++){

printf("%u\r\n",Read_ADC(_index));
LPC_GPIO0->DATA &=~(1<<8);
delay_ms(250);
LPC_GPIO0->DATA |=(1<<8);
delay_ms(250);

}

}

}

Arm Cortex: ADC

Código: [Seleccionar]
#include <lpc11xx.h>
#include "SetClock48Mhz.h"


void Timer16b1_ms(uint16_t _ms1_){

LPC_SYSCON->SYSAHBCLKCTRL |= (1<<8);
LPC_TMR16B1->TCR = 0x02;
LPC_TMR16B1->PR = 48000;
LPC_TMR16B1->MR0 = _ms1_;
LPC_TMR16B1->IR = 0x01;
LPC_TMR16B1->MCR |= (1<<2);
LPC_TMR16B1->TCR = 0x01;

while(LPC_TMR16B1->TCR & 0x01);

}


void Timer16b0_ms(uint16_t _ms0_){

LPC_SYSCON->SYSAHBCLKCTRL |= (1<<7);
LPC_TMR16B0->TCR = 0x02;
LPC_TMR16B0->PR = 48000;
LPC_TMR16B0->MR0 = _ms0_;
LPC_TMR16B0->IR = 0x01;
LPC_TMR16B0->MCR |= (1<<2);
LPC_TMR16B0->TCR = 0x01;

while(LPC_TMR16B0->TCR & 0x01);

}

/*
Funcion de Inicializar Salidas y entradas
*/
void SetIOs(void){
LPC_GPIO0->DIR =(1<<8);
}

int main(void){

SetClockTo48Mhz();
SetIOs();

while(1){

LPC_GPIO0->DATA &=~(1<<8);
Timer16b0_ms(1000);
LPC_GPIO0->DATA |=(1<<8);
Timer16b0_ms(1000);

}

}

Arm Cortex: Timer 0 de 16 bits

Saludos Cordiales!

Desconectado george.manson.69

  • PIC10
  • *
  • Mensajes: 33
    • Microcontroladores en General
Re: ARM Cortex:Timer 0 Int
« Respuesta #1 en: 25 de Marzo de 2014, 01:41:42 »
Hola,

Les comparto como configurar el Timer 0 de 16 bit como interrupcion con el microcontrolador Lpc1114/302.

Código: [Seleccionar]
#include <lpc11xx.h>
#include "SetClock48Mhz.h"

uint16_t cont;

void Timer16b1_ms(uint16_t _ms1_)
{

LPC_SYSCON->SYSAHBCLKCTRL |= (1<<8);
LPC_TMR16B1->TCR = 0x02;
LPC_TMR16B1->PR = 48000;
LPC_TMR16B1->MR0 = _ms1_;
LPC_TMR16B1->IR |= (1<<0);
LPC_TMR16B1->MCR |= (1<<2);
LPC_TMR16B1->TCR = 0x01;

while((LPC_TMR16B1->TCR & 0x01));

}


void Timer16b0_ms(uint16_t _ms0_)
{

LPC_SYSCON->SYSAHBCLKCTRL |= (1<<7);
LPC_TMR16B0->TCR = 0x02;
LPC_TMR16B0->PR = 48000;
LPC_TMR16B0->MR0 = _ms0_;
LPC_TMR16B0->IR |= (1<<0);
LPC_TMR16B0->MCR |= (1<<2);
LPC_TMR16B0->TCR = 0x01;

while(LPC_TMR16B0->TCR & 0x01);

}

/*
Funcion de Inicializar Salidas y entradas
*/
void SetIOs(void)
{
LPC_GPIO0->DIR |=(1<<8) + (1<<9);
LPC_GPIO1->DIR |=(1<<10) + (1<<11);
}

void TIMER16_0_IRQHandler(void)
{

if((LPC_TMR16B0->IR & 0x01)==1){

LPC_GPIO0->DATA  ^= (1<<8);
cont++;
}

LPC_TMR16B0->IR = 0x1F;
}

void TIMER16_1_IRQHandler(void)
{

if((LPC_TMR16B1->IR & 0x01)==1){

LPC_GPIO0->DATA  ^= (1<<9);

}

LPC_TMR16B1->IR = 0x1F;
}

void TIM16B0_INT_init(uint16_t ms)
{
LPC_SYSCON->SYSAHBCLKCTRL |= (1<<7);
LPC_TMR16B0->TCR = 0x02;
LPC_TMR16B0->PR  = 48000;
LPC_TMR16B0->MR0 = ms;
LPC_TMR16B0->IR  = 0x01;
LPC_TMR16B0->MCR = 0x03;
LPC_TMR16B0->TCR = 0x01;
NVIC_EnableIRQ(TIMER_16_0_IRQn);
}

void TIM16B1_INT_init(uint16_t ms)
{
LPC_SYSCON->SYSAHBCLKCTRL |= (1<<8);
LPC_TMR16B1->TCR = 0x02;
LPC_TMR16B1->PR  = 48000;
LPC_TMR16B1->MR0 = ms;
LPC_TMR16B1->IR  = 0x01;
LPC_TMR16B1->MCR = 0x03;
LPC_TMR16B1->TCR = 0x01;
NVIC_EnableIRQ(TIMER_16_1_IRQn);
}

int main(void)
{

SetClockTo48Mhz();
SetIOs();

TIM16B0_INT_init(500);
TIM16B1_INT_init(250);

while(1){

switch(cont){

case 2:
LPC_GPIO1->DATA  ^= (1<<10);
break;

case 4:
LPC_GPIO1->DATA  ^= (1<<11);
cont=0;
break;

}

}

}

Timer 0 IntTimer 0 Int

Saludos!

Desconectado george.manson.69

  • PIC10
  • *
  • Mensajes: 33
    • Microcontroladores en General
Tutoriales ARM
« Respuesta #2 en: 03 de Mayo de 2017, 19:35:17 »
Hola todos,

Les comparto mas videos de Microcontroladores ARM.


¡Saludos!

Desconectado george.manson.69

  • PIC10
  • *
  • Mensajes: 33
    • Microcontroladores en General
LPC1114 + Keil + Fatfs
« Respuesta #3 en: 02 de Septiembre de 2017, 17:41:13 »
Hola a todos,

En este tutorial vamos a usar una tarjeta de MicroSD con un microcontrolador LPC1114 de la compañia de NXP, ya habiamos realizado algunas practicas halla por los años 2014 :D, pero ahora hemos de regresar en algo muy bueno ya que con esto podemos realizar DATA LOGGER, donde puede monitorear y siempre estar granado datos en la tarjeta.

Para empear necesitamos tener KEIL ya que es mi pan de cada dia, aunque muchos diran que no es bueno, yo digo todo lo contrario, creo que es un excelente IDE para programar microcontroladores de todas las compañias que utilicen ARM CORTEX.


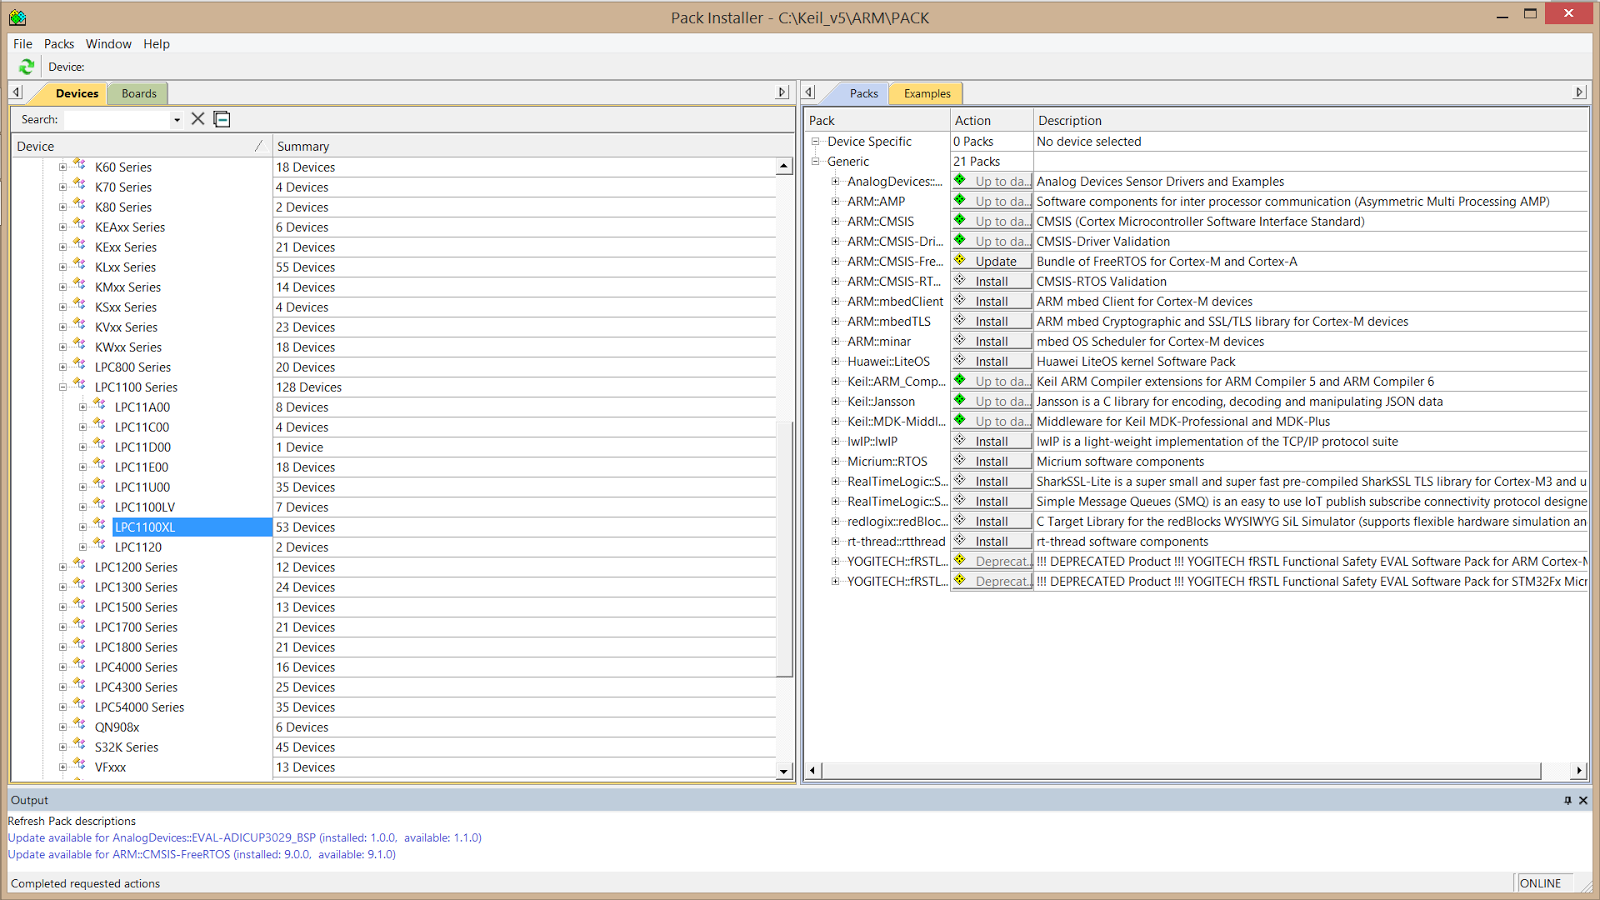
Actualmente esta la version 5.24a con su Pack Installer que nos permite actualizar las librerias de cada microcontrolador de diferentes compañias. Cuando bajas el software de Keil Uvision 5 te pedira registrarte solo es para llevar una contabilizacion de donde y cuales son tus metas al usar la herramienta, al terminar de regitrarte, te enviara a otra pagina donde ya podras instalar el software.
Al instalarse se podra usar por 60 dias en modo profesional, donde no tendras limite de codigo, apaso del los 60 dias se cambiara a modo de evalucion sin limite de tiempo solo que podras debuggear o compilar hasta 32 Kb de ROM (Mas que suficiente para algunos).

Cuando abrimos Keil, nos dirigimos a presionar el boton de Pack Installer para agregar las librerias de los microntroladores LPC11xx.


El codigo mostrado es para poder manejar las tarjetas microSD, se utiliza la libreria de Fatfs Junto con la lirebria de perifericos que ya NXP nos proporciona lo puedes bajar aqui.(Baja la version de LPC11U24 para su correcto funconamiento).

http://elm-chan.org/fsw/ff/00index_e.html

Código: [Seleccionar]
#include "chip.h"
#include <stdio.h>
#include <string.h>
#include "SPI_MSD_Driver.h"
#include "diskio.h"
#include "ff.h"

FATFS fs;         /* Work area (file system object) for logical drive */
FIL fsrc;         /* file objects */   
FRESULT res;
UINT br;


char path[512]="0:";
char textFileBuffer[50];   
uint16_t data[2];

void __delay_ms(uint32_t time){

for(uint32_t t=time*500000;t>0;t--);

}
int SD_TotalSize(void){
    FATFS *fs;
    DWORD fre_clust;       

    res = f_getfree("0:", &fre_clust, &fs);  /* ±ØÐëÊǸùĿ¼£¬Ñ¡Ôñ´ÅÅÌ0 */
    if ( res==FR_OK )
    {
  /* Print free space in unit of MB (assuming 512 bytes/sector) */
      printf("\r\n%d MB total drive space.\r\n"
             "%d MB available.\r\n",
           ( (fs->n_fatent - 2) * fs->csize ) / 2 /1024 , (fre_clust * fs->csize) / 2 /1024 );

  return 1;
}
else
  return 0;   
}

void Open_Periphericals(void){

Chip_GPIO_Init(LPC_GPIO);

/*Funciones para configurar PINs*/

/*Configuracion de Pines del USART*/

Chip_IOCON_PinMuxSet(LPC_IOCON,IOCON_PIO1_6, FUNC1);
Chip_IOCON_PinMuxSet(LPC_IOCON,IOCON_PIO1_7,FUNC1);

/*Configuracion de Pines del ADC*/

Chip_IOCON_PinMuxSet(LPC_IOCON,IOCON_PIO0_11,FUNC2);
Chip_IOCON_PinMuxSet(LPC_IOCON,IOCON_PIO1_0,FUNC2);

/*Configuracion de Pines del SSP0*/

Chip_IOCON_PinMuxSet(LPC_IOCON,IOCON_PIO0_9,FUNC1);
Chip_IOCON_PinMuxSet(LPC_IOCON,IOCON_PIO0_8,FUNC1);
Chip_IOCON_PinLocSel(LPC_IOCON,IOCON_SCKLOC_PIO2_11);
Chip_IOCON_PinMuxSet(LPC_IOCON,IOCON_PIO2_11,FUNC1);

/*Configuracion de Pines de GPIO*/

Chip_IOCON_PinMuxSet(LPC_IOCON,IOCON_PIO1_10,FUNC0);
Chip_GPIO_SetPinDIROutput(LPC_GPIO,1,10);

Chip_IOCON_PinMuxSet(LPC_IOCON,IOCON_PIO1_11,FUNC0);
Chip_GPIO_SetPinDIRInput(LPC_GPIO,1,11);

/*
* Inicializa UART0  a 115200 bps
*
*
*
*/


Chip_UART_Init(LPC_USART);
Chip_UART_SetBaud(LPC_USART,115200);

/*
* Inicializa ADC  a 400KSPS
*
*
*
*/

ADC_CLOCK_SETUP_T AdcSetup;

Chip_ADC_Init(LPC_ADC,&AdcSetup);


Chip_SSP_Disable(LPC_SSP0);
Chip_SSP_Init(LPC_SSP0);
Chip_SSP_Enable(LPC_SSP0);


}

int main(void){

SystemCoreClockUpdate();

Open_Periphericals();
/*Main Code Here*/
if( _card_insert() == 0 ){

printf("-- SD card detected OK \r\n");

}
else
{
printf("-- Please connect a SD card \r\n"     );
while( _card_insert() != 0 );
printf("-- SD card connection detected \r\n");
__delay_ms(10);
}
   
f_mount(&fs,"",0);
 
res = f_open( &fsrc , "Simple20.csv" , FA_CREATE_NEW | FA_WRITE | FA_OPEN_APPEND);

if ( res == FR_OK )
{
/* Write buffer to file */

for(uint32_t cont = 0; cont<50; cont++){

for(uint8_t ADC_Cont = 0; ADC_Cont<2;ADC_Cont++){

Chip_ADC_EnableChannel(LPC_ADC,ADC_Cont,ENABLE);
Chip_ADC_SetStartMode(LPC_ADC,ADC_START_NOW,ADC_TRIGGERMODE_RISING);

while(Chip_ADC_ReadStatus(LPC_ADC,ADC_Cont,ADC_DR_DONE_STAT)==RESET);

if(Chip_ADC_ReadValue(LPC_ADC,ADC_Cont,&data[ADC_Cont]) == ERROR){

printf("Error\r\n");

}


Chip_ADC_EnableChannel(LPC_ADC,ADC_Cont,DISABLE);

}

sprintf(textFileBuffer,"%u,%u\r\n",data[0],data[1]);


res = f_write(&fsrc, textFileBuffer,(unsigned) strlen(textFileBuffer), &br);     

if(res == FR_OK){

printf("Simple20.csv successfully created        %u,%u\r\n",br,cont);

}else{

printf("Simple20.csv successfully created with some Error        %u\r\n",res);


}

__delay_ms(10);

}

}
else if ( res == FR_EXIST )
{

printf("Demo.TXT created in the disk      \r\n");

}

f_close(&fsrc);
SD_TotalSize();

f_mount(0,"",0);


for(;;){


}

return 1;

}

El diagrama es el siguiente:


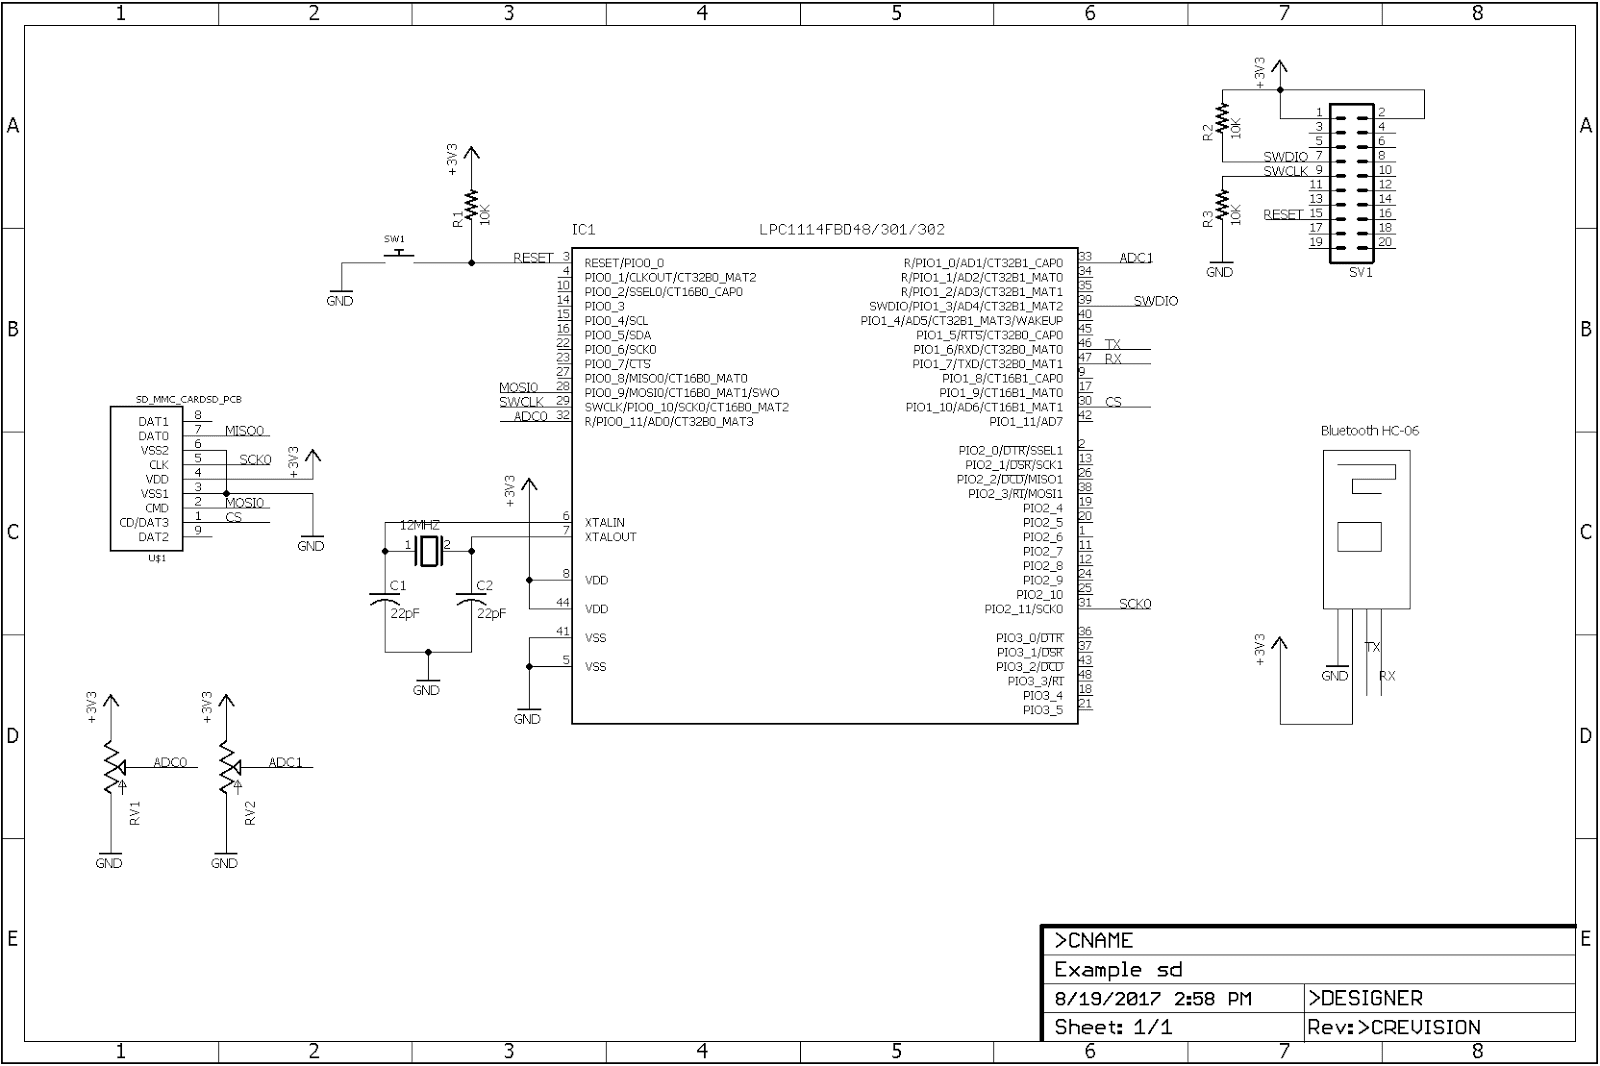
Se ha adherido algunos ejemplos para que el usuario pueda implementarlos en sus proyectos

https://drive.google.com/drive/folders/0B5PHuBzaImxfbktlVU9wTzJjYkk?usp=sharing

¡Saludos!

Desconectado KILLERJC

  • Colaborador
  • DsPIC33
  • *****
  • Mensajes: 8242
Re:ARM Cortex: Inicializacion
« Respuesta #4 en: 02 de Septiembre de 2017, 17:58:09 »
El problema de KEIL es ..... es pago.